
How To Easily Update WordPress Theme Manually or Automatically in 2023

Read Time: 13 minutes
FrontLook is free-to-read because of viewers like you. We receive a commission from any purchases made from links on our website.
Learning to update a WordPress theme is an essential part of maintaining a functioning website for those familiar with the platform. In this guide, we’ll go over why and how to update theme in WordPress so you will be able to perform manual updates, different types of available updates for parent/child themes, and even premium or custom-built ones.
For those who want the hassle-free approach, we’ll show you how to enable an automatic theme update so that your site is kept up-to-date with any new version with minimal effort. Additionally, we will discuss the built-in WordPress theme customizer and its role in theme customization.
We understand that some users may be hesitant about making changes to the theme file or themes folder. Hence, we will supply a comprehensive guide to demonstrate how to modify your theme files without disruption.
By following this guide on updating WordPress themes, you can ensure that your website runs smoothly while staying up-to-date with the latest features and security patches.
Which Section Is Your Starting Point?
- Using First-Party WordPress Themes and Automatic Updates
- Updating Manually? Backup Your Existing Website
- Selecting a New Theme? Here’s How To Get Things Moving
- Manually Upload and Install the Updated Theme
- Using and Testing Your New WordPress Theme
- The Key Takeaways for Updating A WordPress Theme
- FAQs
Using First-Party WordPress Themes and Automatic Updates

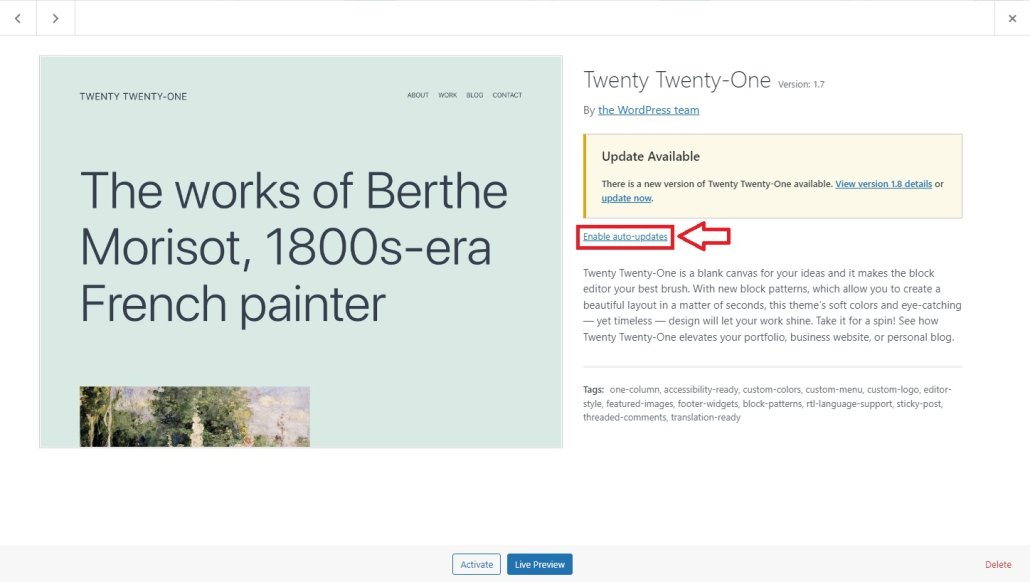
Themes that are directly through WordPress, both premium themes and free themes take only minutes to update and require very little effort on the user’s part. Simply logging into your WordPress site and navigating to your theme folder to find your active theme and checking for an update is all you have to do!
Look for the Appearance tab on the left column and then click Themes from the submenu that appears. The WordPress theme automatically will let you know if there is an update and will give you the option to click and get it started. The new theme files will install and update your WordPress theme with no hassle!
To set up automatic updates, there is a simple link to click in the description of the theme you’ve chosen. This can be turned off similarly, with the location varying from theme to theme.
Things get trickier when it comes to using third-party themes and integrating them into your WordPress website. Sometimes your hosting provider will have WordPress themes, but those can either automatically install or requires manual installation.


Updating Manually? Backup Your Existing Website
Sometimes WordPress doesn’t have exactly what you want, so you’ll want to use a theme from a specialized website or use the website-building template options offered with some web hosting plans, like Dreamhost. Before making any significant changes to your WordPress theme files, it is always best practice to back up what is currently working. To best ensure that any modifications are safeguarded, keep a copy of your entire website to be able to restore it if needed and prevent data loss. For maximum thoroughness, back up all associated website files, including HTML, CSS, JavaScript, and images before making any changes. You should also create a database backup as well.
Updating a WordPress theme haphazardly can result in bugs, data loss, security holes, or incompatibility issues that can cause complications or downtime.
Although many themes will have options to automatically update or update without third-party plugins, there are plugins like UpdraftPlus, BackWPup, and VaultPress that can be used with WordPress or other CMSs to automate backups if needed.
Where Should You Store Backups?
Some of the more accessible options where to upload your website’s files are to an external drive or cloud storage service such as Dropbox or Google Drive. Dropbox and Google Drive are free services that offer ample space for storage without needing to pay monthly, and all it takes is an account to use. An external hard drive has the convenience of not needing an internet connection to use, as well as larger storage options without having to pay monthly.

Keep Everything In Order And Prepare For Any Loss
When backing up, a recommended practice is to keep track of which version of each file was backed up in case something needs restoring from an older iteration instead of the most recent one. Technology is fickle and sometimes things go wrong for what feels like no reason at all. Best to be prepared for the worst!
Finally, be sure to check whether any customizations were made directly within the codebase itself – either through FTP or by editing individual files within WordPress’ dashboard – since these won’t necessarily be included in plugin-based backups like those mentioned above. If this applies to your situation then it’s best practice to save copies of every single file before updating them with new versions; this way nothing gets lost along the way.
Manual Update Backup Summary:
When making any major changes to a previous theme, it is worth backing up any data or files onto a hard drive or Cloud storage service. For more advanced users, any customizations within the codebase should also be saved in case something needs restoring from an older version instead of the latest one.
Selecting a New Theme? Here’s How To Get Things Moving
Updating your current theme will save you a few steps, but we’re going to begin from the absolute first step which is finding and selecting your first theme. If you’re looking to update your current theme, follow these steps, but with the WordPress theme, you’re already working with.
Step one is identifying which theme you want to update and making sure your chosen theme is compatible with your current WordPress version before proceeding. You can find themes either directly through the WordPress website, third-party WordPress theme websites, or sometimes through your hosting provider (such as Dreamhost and WP Engine). To do this, identify the theme developer or hosting provider of your theme of choice and check any documentation that contains compatibility information on their website. Ensure that the most recent version of WordPress can provide all features and functions by verifying compatibility information from the creator or web host.

Unsure What To Pick? Time To Research!
Next, it’s best practice to scope out some reviews or ratings from other users who have used the same theme. Reviews and ratings from other users of the same theme can be found on sites like ThemeForest or CodeCanyon if you need more sources to ensure you’re getting an accurate spread of user feedback. A theme with a few bad reviews isn’t a problem as long as the feedback is mostly positive, but if themes are three stars or lower (or whichever rating scale is equivalent), it might be worth your while to reconsider an alternative WordPress theme.
After deciding which WordPress theme to move forward with, test out and experiment with the theme with a dummy page, a staging site, or any sort of simulated environment (if you have the resources). A staging site, the more recommended option, will allow you to see if certain plugins work better with certain themes than others. The changes made from selecting a new theme may not be obvious at first glance, but the changes made on the staging site could save you time down the line when setting up your site’s design and layout structure.
Once you have decided which theme is suitable for your needs, the next step is to download and install it on your website.
Summary of Selecting A New Theme:
When selecting a theme, you can go directly through WordPress, your hosting provider (if they offer themes), or through a third-party source. The closer you are to first-party themes, the easier it is to update later.
Manually Upload and Install the Updated Theme

Once all precautions are made and you’ve decided to update your current WordPress theme files or update to a new one, it’s time to leap forward!
After you have all your downloaded theme content ready to go, you can use WordPress’s built-in uploader tool or an FTP client software such as FileZilla to connect to your web server and upload the new files into the correct directory for that particular theme. Ensure all necessary documents are correctly transferred before taking any further action; otherwise, this could lead to issues when attempting to switch it on at a later date.
After uploading all necessary files, log into your WordPress dashboard and navigate to Appearance > Themes to activate it. Take a few moments to check out how everything looks before activating your new theme. Ensure that all material is displayed accurately, in addition to any personalized alterations or plugins you may have installed before. It’s also important that you test any features that are part of the updated theme, such as sliders or contact forms, so they work properly when activated.
Select “Activate” under the newly installed theme and once completed, check if everything looks okay by viewing different pages on both desktop and mobile devices while logged out (as a visitor). If anything looks off then go back through each step again until everything works as expected – don’t forget about cross-browser compatibility too.
After Uploading, Make Sure To Update To The Latest Version
Log in to the dashboard and navigate to Appearance > Themes, then click “Update Themes” for automatic WordPress theme updating. Once there, select the desired updated version of the parent (or main) theme and hit “Update Now”. If there is an available child (or additional) theme associated with this parent one, be sure to also download and install it as well so that both versions are compatible with each other. Finally, don’t forget to check if any customization options have changed since last time – these may need adjusting after an update has been completed.
If something doesn’t look right after activating your new theme, don’t worry. You can always revert to an earlier backup if necessary by deactivating it first then uploading and installing a previous version from a saved copy in just a few clicks – no coding required. With this method, there’s no risk involved in updating themes since anything unexpected can be easily corrected without having to start over from the beginning again.

Custom Themes, Parent Theme Files, or Child Theme Folder
For more advanced users, you may have to go so far as to adjust the parent and child theme folders. This pertains primarily if you are working with a custom theme or custom code, or if you are a theme developer.
A parent theme can be thought of as the main source of the theme’s information, with a child theme being “duplicates” that you can customize and adjust without making major changes to the source. You can manually create a child theme in your parent theme folder. There is no official button or command that does this, it is accomplished by copying the parent folder and adding some iteration of the word “child” in the file name.
Any major changes should be tested out in a staging site before unleashing them on the live site and require a high degree of testing. To save confusion we can save the broader topic of theme customization for a different article, but it’s nice to know there are more customizable options than being stuck with the WordPress themes directory.
Manually Updating and Installing Summary:
Most themes can be uploaded directly to WordPress, but you can also use FTP services if needed. You should not need more advanced theme update methods such as parent theme or child theme files unless you are working with a custom theme.
Using and Testing Your New WordPress Theme

Once your theme is activated, you can begin customizing it to ensure everything appears and operates as desired. Now that your theme is live, let’s see how it performs.
Verifying your recently established template is an indispensable measure for making sure it operates as intended and appears attractive on all gadgets. To ensure a successful installation, preview the website on multiple browsers such as Chrome, Firefox, Safari, and Edge. Additionally, you should check for any errors or bugs that may have been introduced during installation.
You can also use tools like BrowserStack to test your website across multiple operating systems and device types. This will assist you in recognizing possible issues before they develop into major difficulties for your site’s visitors. Additionally, you can use web development tools like Firebug or Web Inspector to debug any issues with the design or functionality of your theme.

Verifying that visuals appear correctly and page components are loading rapidly when seen from multiple devices and browsers is also crucial. Google PageSpeed Insights can be utilized to gauge how quickly the pages display on both desktop and mobile devices. If there are any slow-loading elements, try optimizing them by compressing images or minifying JavaScript files so they take up less space in the browser cache.
Lastly, it is a good idea to run automated tests using services such as Selenium or PhantomJS which simulate user interactions with your site (clicking buttons/links, etc.). This helps uncover potential bugs that would otherwise go unnoticed until someone actually uses the website in real-life scenarios – something no amount of manual testing can replicate accurately.
Sometimes you don’t have to pay for additional third-party services if your web-hosting plan has ways to test your website already. Many middle-to-high-tier plans will automatically give you insights on what’s working or not, and can even seek out bugs, check user interactions and give you accurate metrics on site visitors and more.
Using And Testing Summary:
Make sure your new theme works properly on different web browsers and mobile. If your web host provides it, check that your new theme does not affect the user experience negatively.
The Key Takeaways for Updating A WordPress Theme
In most cases, companies want to make updating your WordPress theme to the latest version for your WordPress website as easy as possible. The process tends to be very clearly outlined within the GUI, but there will come times when you have to take matters into your own hands.
Thankfully, you don’t need an elaborate custom setup that requires you to have to create a child theme, adjust a parent theme, and make the theme update process a huge headache. Making sure to know your limitations and also how deep you want to go if you want to update a WordPress theme will save you lots of trouble.
Start simple if you’re only beginning to build websites and stick to the WordPress theme directory with the free or premium theme files. We can always go into more detail with customizing things later, but one thing at a time!
FAQs
It replaces the existing theme with its newest iteration. Upgrading the theme ensures that your site is running on the newest codebase, incorporating any new functionalities or bug fixes provided by its creators. Additionally, updating themes can help ensure compatibility with other plugins or tools being used on your site. It’s important to keep in mind that after an update there may be changes to existing settings that require adjustments for optimal performance.
Updating a theme in WordPress is an important part of keeping your website secure and up to date. Logging into the WordPress dashboard, navigate to Appearance > Themes, and select “Update Now” for the theme you want to update. Before updating any themes or plugins, ensure that a backup of your site is taken as this will protect against the possibility of data loss if an issue arises during the process. After completing these steps, make sure you check for any compatibility issues with other plugins or themes before pushing live changes.
WordPress themes are typically updated regularly, usually every few months. Keeping the theme current is essential to ensure it offers the most recent security and compatibility updates. To ensure their product’s continued relevance, theme developers regularly introduce new features or improve existing ones for a more enjoyable WordPress experience. Developers of WordPress themes also strive to make sure their products remain competitive by staying ahead of trends in web design and development.
When a WordPress theme is no longer updated, it means that the developer has stopped providing bug fixes and security updates. Without regular updates, your website could become vulnerable to malicious attacks and unable to keep up with changes in web technology. Outdated themes may not work with more recent WordPress versions or plugins, potentially causing compatibility problems. To keep your site safe and functioning as intended, it’s important to routinely inspect any themes used and substitute them if the developer no longer offers support.

